Automating Prototype Iterations With CI for Hardware
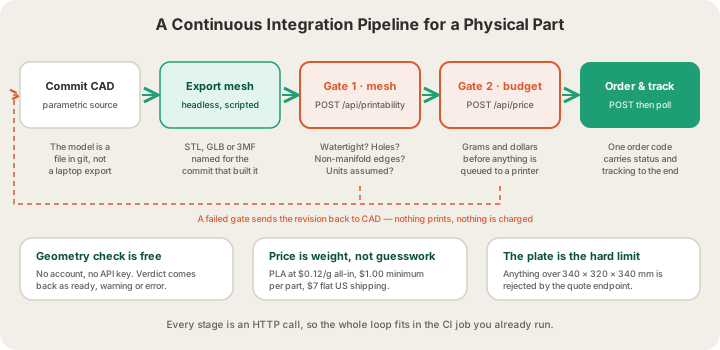
Continuous integration for hardware means running a physical revision through the same gates you run code through: build the mesh from parametric source, lint its geometry, price it, and only then order the ones that passed. Nothing about that requires a printer on your desk — each stage is an HTTP call, so it fits inside the CI job you already run on every commit. The difference from software CI is that the last stage costs real money, which is exactly why the gates in front of it matter.
What CI Actually Means for a Physical Part
The value of CI was never the automation itself. It was that failures became cheap and early. A hardware loop has the same failure modes, just slower and more expensive: a mesh with a hole in it wastes six hours of machine time before anyone notices, and a units mistake turns a 40 mm bracket into a 400 mm one that will not fit on a plate. Map each software stage onto its physical equivalent and the pipeline writes itself.
| Software CI stage | Hardware equivalent | What it costs to skip |
|---|---|---|
| Build | Export a mesh from parametric CAD source | Nobody can reproduce last week's part |
| Lint | Geometry check: watertight, manifold, wound consistently | A slicer silently patches the hole its own way |
| Unit test | Assert dimensions and minimum feature size | The part prints and then does not fit |
| Budget check | Quote the revision in grams and dollars | A scale mistake shows up on the invoice |
| Deploy | Submit a print order | Manual uploads, manual typos |
| Monitoring | Poll the order status until it ships | Nobody knows where revision 7 went |
Stage 1: Make the Geometry Reproducible
The precondition for all of this is that the model can be built by a machine. A .f3d file someone exported by hand from their laptop is the hardware equivalent of a binary checked into the repo with no source. Parametric, text-based CAD — OpenSCAD, CadQuery, build123d, or a Fusion 360 script — gives you a diffable source file, meaningful pull requests, and a headless export step.
# build.sh — one command, deterministic output
SHA=$(git rev-parse --short HEAD)
openscad -o "build/bracket-$SHA.stl" \
  -D 'wall=2.4' -D 'bolt_d=5.2' src/bracket.scad

ls -lh "build/bracket-$SHA.stl"
Two rules keep this honest. Name the output after the commit that produced it, so an order six weeks old can be traced back to a diff. And treat the mesh as a build artifact, not a repo file — regenerate it, do not commit it, or you will eventually ship a part that does not match its source.
Stage 2: Lint the Mesh Before It Costs Anything
This is the gate that pays for itself. Our printability endpoint takes a mesh and returns a pure-geometry report — no account, no API key, no credits, because the question it answers comes before anyone pays for anything. It is a single multipart POST with the file in a field called model.
curl -s -X POST https://x3dstudios.com/api/printability \
  -F "model=@build/bracket-$SHA.stl" > report.json

jq -e '.report.verdict != "error"' report.json || {
  echo "geometry gate failed:"; jq -r '.report.issues[].title' report.json; exit 1;
}
The response wraps a flat report object, which makes it easy to assert on. These are the fields worth wiring into a build:
| Field | What it tells you | Fail the build? |
|---|---|---|
| verdict | ready, warning or error — the one-line summary | Yes on error |
| watertight | Whether the surface is closed | Yes |
| holes / largestHoleMm | Count of boundary loops and the widest rim in mm | Yes if largestHoleMm is non-trivial |
| nonManifoldEdges | Edges shared by three or more faces | Yes |
| degenerateFaces | Zero-area triangles from a bad boolean | Warn, then investigate |
| consistentWinding | Whether every normal points the same way | Yes |
| boundingBoxMm | Overall size in mm — assert your expected dimensions here | Yes on drift |
| smallestExtentMm | Smallest overall dimension, a proxy for thin parts | Warn below ~1 mm |
| triangleCount / vertexCount | Mesh density after welding | Warn on runaway tessellation |
| unitsAssumed | True when the file did not declare its scale | Yes for GLB exports |
One caveat worth writing into your assertions: smallestExtentMm is the smallest overall dimension of the part, not its minimum wall thickness. Real wall thickness needs a distance field and this check does not compute one, so treat it as a smoke alarm rather than a measurement. /blog/why-print-ready-matters-mesh-validation goes through what each of these defects actually does to a slicer.
Stage 3: The Budget Gate
A geometry check tells you the part is printable. It does not tell you whether you meant to spend that. Our quote endpoint takes a bounding box and returns weight, hours and price, with no auth required, which makes it a natural threshold to assert against.
curl -s -X POST https://x3dstudios.com/api/price \
  -H "Content-Type: application/json" \
  -d '{"bboxMm":{"x":90,"y":60,"z":30},"material":"pla","quality":"standard","quantity":1}'

# { "grams": 90, "printHours": 4.46, "materialCost": 10.8, "machineCost": 0,
#   "perUnit": 10.8, "subtotal": 10.8, "shipping": 7, "total": 17.8, "currency": "USD" }
PLA is $0.12 per gram all-in — filament and normal machine time together — with a $1.00 minimum per part and billable weight rounded up to the whole gram. Shipping is a flat $7 in the US, free over $50. The endpoint also enforces the plate: anything that will not fit in 340 × 320 × 340 mm in its best orientation comes back as a 400, which is a free check that your revision still fits the fleet.
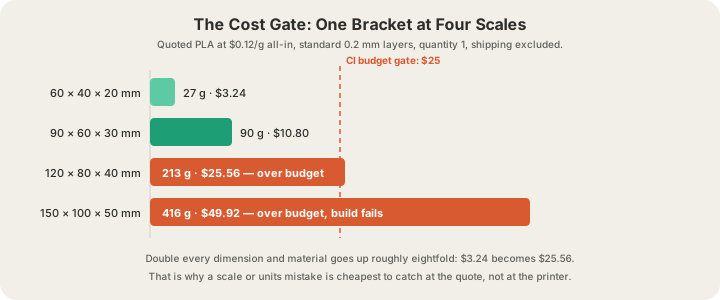
That cubic relationship is the reason the budget gate catches things the geometry gate cannot. A parameter that accidentally scaled by 2 still produces a perfectly watertight, perfectly manifold mesh — it just costs eight times as much. A threshold of "fail if total exceeds $25" turns that into a red build instead of a surprise on a statement.
Stage 4: Order Only What Passed
The deploy step is one authenticated POST with the file attached — the same submission the upload form at /print makes for you. Gate it behind whatever your team gates a production deploy behind — a tag, a manual approval, a label on the pull request — because this is the stage that spends money.
curl -X POST https://x3dstudios.com/api/print/orders \
  -H "Authorization: Bearer $X3D_API_KEY" \
  -F "file=@build/bracket-$SHA.stl" \
  -F "material=pla" -F "quality=standard" -F "quantity=3" \
  -F "recipientName=Hardware Team" \
  -F "street1=1 Analytical Way" \
  -F "city=Austin" -F "state=TX" -F "zip=78750" -F "country=US" \
  -F "note=rev $SHA — check bolt hole clearance"
Quality is standard at 0.2 mm layers, or premium at 0.1 mm for 1.75× the rate — worth it for a surface finish review, wasteful for a fit check. Quantity is where prototyping economics get pleasant: bulk pricing starts at 5 units for 5% off and 10 units for 10% off, so ordering three variants of the same bracket in one run is usually cheaper per part than ordering one and iterating. /blog/add-3d-printing-to-your-app documents every field on this endpoint.
Stage 5: Track It Like a Deploy
Store the order code that comes back. It is the only handle you need afterwards, and GET /api/print/orders/:code with the same key returns the current status, the estimated cost and a tracking object once the part is moving. The statuses run in a straight line and never go backwards, which makes them easy to render on a dashboard next to your build.
| Status | What it means for the revision |
|---|---|
| PENDING_PAYMENT | Created but unpaid — the card failed, use paymentUrl |
| RECEIVED | Paid and in review |
| ACCEPTED | Approved and queued to a printer |
| PRINTING | On a machine right now |
| PRINTED | Off the plate, being packed |
| SHIPPED | Tracking number and carrier are populated |
| DELIVERED | Closed — go measure the part |
Between ACCEPTED and PRINTED the farm runs its own checks that you get for free: every G-code file is validated before a nozzle heats, the fleet carries live camera streams, and the four-tray AMS handles filament swaps without an operator. If you would rather be told than poll, /blog/webhooks-for-atoms works through pushing these transitions into a chat channel.
What to Run When
Running the whole pipeline on every commit is the wrong default — the first two stages are free and fast, the last one is neither. A sensible split:
| Trigger | Stages | Cost |
|---|---|---|
| Every push | Export + geometry check + dimension asserts | Free, seconds |
| Every pull request | Add the quote gate and post the price as a comment | Free |
| Merge to main | Nothing automatic — hold the artifact | Free |
| Tagged release or manual approval | Submit the print order, poll to delivered | $0.12/g PLA + $7 US shipping |
That shape gives you what CI was always for: a broken revision is caught in seconds by a machine, a costly revision is caught before it is ordered, and a human only gets involved to say "yes, print it." Turnaround from that approval is typically 24 to 48 hours out of Austin, which puts a full design-build-measure loop inside a week. /blog/rapid-prototyping-48-hours walks the same loop from the workshop side, and the endpoint reference lives at /api-docs.
FAQ
Can you automate 3D printing from a CI pipeline?
Yes. Export the mesh in your build step, POST it to a geometry check, POST its bounding box to a quote endpoint to assert on cost, then POST the file to the order endpoint with an API key when a human or a tag approves it. All four are plain HTTP calls, so GitHub Actions, GitLab CI or a cron job on a box can all drive them.
How do you test a 3D model automatically?
Assert on the geometry report: watertight true, nonManifoldEdges zero, consistentWinding true, degenerateFaces zero, and a boundingBoxMm that matches the dimensions your design intends. Those five catch almost every export bug. Fit and function still need a physical part, which is what the order stage is for.
What does one prototype revision cost through the API?
PLA is $0.12 per gram all-in with a $1.00 minimum per part, and US shipping is a flat $7. A 90 × 60 × 30 mm bracket quotes at about 90 g, so roughly $10.80 for the part and $17.80 delivered. Three variants in one order share the shipping, and five or more units take 5% off.
Does the pipeline work with OBJ files?
No — configure your exporter for STL, GLB, 3MF or G-code instead. STL and GLB uploads go up to 100 MB and pre-sliced files up to 40 MB. STL is the safe default for a single-body bracket; 3MF is better when the revision has multiple bodies you want to keep separate for colour.
Ready to get started?
Upload a 3D model for instant pricing, or generate one with AI.