3D Printing Cosplay Armor: Helmets, Props, Finishing
3D printing cosplay armor works like this: you print hollow shells in PLA, split anything longer than 340 mm into keyed sections, glue them, and then spend most of your calendar on filler primer and sandpaper. A full adult armor kit runs roughly 1.5 to 2 kg of filament, which at our $0.12 per gram all-in PLA rate is about $180 to $240 of printed parts. Printing is the cheap, predictable half of the build. Finishing is where the costume is actually made.
3D Printing Cosplay Armor vs Cutting Foam
EVA foam is lighter, cheaper, and far more forgiving of a body that has to move, sit, and get through a convention door. What foam cannot do easily is symmetry and repeatability. A printed pauldron is identical to its mirror twin down to the rivet, a printed helmet has the same crisp hard-surface bevels every time, and if a bracer snaps on Saturday morning you can reprint exactly that bracer instead of rebuilding it from a pattern.
The strongest kits mix both. Print the helmet, chest plate, greaves and greeblies where hard edges and clean curves matter, and keep the shoulder straps, undersuit padding and anything that has to flex in fabric or foam. That split also keeps weight sane: a printed helmet is comfortable, a fully printed suit that includes the soft parts is a workout.
Sizing Armor to a 340 mm Build Volume
Our Bambu Lab H2S machines give a 340 x 320 x 340 mm build volume, which is large enough that the geometry question changes. Most adult helmets fit whole. Most chest plates and every prop weapon do not. Here is how the usual pieces fall out.
| Piece | Typical size | Fits 340 x 320 x 340 mm? | Sections |
|---|---|---|---|
| Adult helmet | 280 x 240 x 250 mm | Yes | 1 |
| Chest plate | 400 x 320 x 180 mm | No | 2 |
| Pauldron | 260 x 220 x 140 mm | Yes | 1 each |
| Bracer | 300 x 130 x 120 mm | Yes | 1 each |
| Blaster or rifle prop | 600-900 mm long | No | 3 |
| Sword blade | 900-1,100 mm long | No | 3-4 |
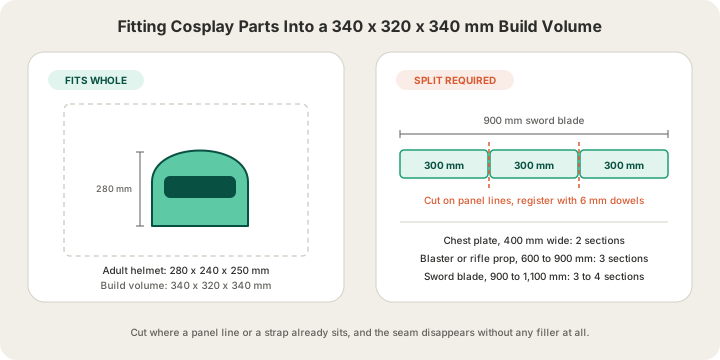
Where you cut matters more than how many cuts you make. Put the seam on a panel line, a bevel edge, or under a strap the costume already has, and the joint disappears without any filler at all. Cut through a smooth curved face and you have just signed up for two hours of sanding on a surface the camera will look straight at. Add alignment features while you are at it: 6 mm dowel holes, a shallow dovetail, or a printed spline that registers the halves so glue-up cannot drift. The full cut-and-key workflow, including where to place dowels so a glue-up cannot drift, is in How to Split a 3D Model for Printing Big Parts.
What a Full Armor Kit Weighs and Costs
Cosplay parts are shells, not solids. We slice armor with six perimeters, about 2.4 mm of wall, and 8 to 10 percent gyroid infill, which is stiff enough to survive a con and light enough to wear all day. Hollowing is the single biggest lever on the bill, and the arithmetic behind it is in How to Hollow a 3D Print and Save 40% on Material. These are real slice weights for a mid-size adult kit at 0.2 mm layers, priced at the $0.12 per gram all-in PLA rate. /docs/materials compares all five materials, their rates and what each is for.
| Piece | Sections | Weight | PLA cost |
|---|---|---|---|
| Helmet | 1 | 520 g | $62.40 |
| Chest plate | 2 | 380 g | $45.60 |
| Blaster prop | 3 | 340 g | $40.80 |
| Sword | 3 | 300 g | $36.00 |
| Pauldrons (pair) | 2 | 220 g | $26.40 |
| Bracers (pair) | 2 | 160 g | $19.20 |
| Full kit | 13 | 1,920 g | $230.40 |
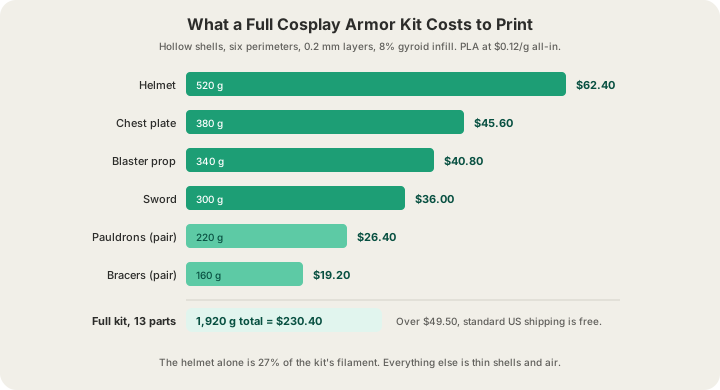
Two things fall out of that table. First, a kit like this is 13 different parts, so the bulk tiers do not apply (5 and 10 percent come off copies of the same part), but it is well past the $49.50 free-shipping line, so the $7 standard US shipping charge never appears ($15 express is never free). Second, small parts have a floor: every part bills at a $1.00 minimum with weight rounded up to the whole gram, so a 4 g belt buckle and a 6 g insignia are each $1.00. Print greeblies as a plated set rather than one at a time and you stop paying the minimum over and over. Full rate tables live at /pricing.
Choosing Materials for Props and Armor
Almost all cosplay is PLA, and that is the correct default. It is as cheap as anything we run, it prints large thin shells without warping, and it sands and takes primer better than anything else on the shelf. The exceptions are specific and worth knowing before you commit a 12-hour print.
| Material | $/g all-in | Where it belongs | Watch out for |
|---|---|---|---|
| PLA | $0.12 | Helmets, plates, greeblies, anything painted | Softens in a hot car or a parked trunk |
| PETG | $0.12 | Buckles, strap anchors, hinge brackets | Gummier to sand, less crisp on fine detail |
| ABS | $0.12 | Parts you plan to acetone-smooth | Needs paint for UV, more warp on big shells |
| ASA | $0.14 | Outdoor cons, parade props, car-stored kit | Priciest rigid rate, still wants paint for color match |
| TPU | $0.25 | Helmet padding clips, gaskets, flex joints | Cannot be sanded flat, will not take filler |
One more material note: flexible joints. A printed cuisse that has to hinge at the knee can use a TPU strip glued between two rigid PLA plates instead of a mechanical hinge. It is quieter, it never binds, and it costs a few dollars, because the flex piece itself is usually under 30 g: under $7.50 at TPU's $0.25 a gram.
Print Settings That Save You Sanding Hours
The tempting move is to buy your way out of sanding with finer layers. Sometimes that is right, usually it is not, and the numbers make the call obvious. Premium 0.1 mm layers price at 1.75 times the standard rate, so the same 520 g helmet lands very differently depending on which you pick.
| Layer height | Rate | 520 g helmet | Finishing effort |
|---|---|---|---|
| 0.2 mm standard | 1x, $0.12/g | $62.40 | 2-3 coats filler primer, 220 then 400 grit |
| 0.1 mm premium | 1.75x, $0.21/g | $109.20 | 1 coat primer, start at 400 grit |
If the piece is going under filler primer and paint, which describes almost all armor, 0.2 mm wins. Primer fills 0.2 mm stepping easily and you were going to sand regardless, so the extra $47 buys you maybe forty minutes. Where 0.1 mm earns its money is on parts that stay unpainted: clear visor pieces, silk or matte display props, and faces or fine sculpted detail where sanding would destroy the thing you paid for. Filament finish helps here too: if you are going unpainted, /blog/pla-surface-finishes-compared shows how much of the layer stepping matte filament simply hides.
Two settings matter more than layer height for a cosplay shell. Wall count: six perimeters instead of three roughly doubles impact resistance at the seams for a fraction of what more infill would cost. And seam placement: put the Z seam on a back edge or an inside corner so the one visible vertical line on your helmet is not down the middle of the faceplate.
Finishing: The Part That Actually Takes the Time
Budget three evenings per large piece. This is the sequence that gets a printed helmet from visible layer lines to a surface that reads as molded plastic on camera.
- Dry fit every section before glue. Sand the mating faces flat, check the keys engage, then bond with CA and activator or a plastic weld. About 1 hour.
- Fill the seams with two-part body filler, slightly proud of the surface. Cure 30 minutes, then knock the high spots down. About 45 minutes.
- Sand the seams flush at 120 grit, then blend outward at 220. This is the step people rush and regret. About 1.5 hours.
- Spray 2 to 3 light coats of high-build filler primer, 20 minutes between coats. Do not try to bury layer lines in one wet coat. About 1 hour.
- Wet sand 400 then 800. Re-prime any spot you sand back to plastic. About 2 hours.
- Base coat, then weathering: panel line wash, dry-brushed edge wear, a little soot where a real one would scorch. About 2 hours.
- Matte or satin clear coat to lock the weathering and kill plastic shine. 30 minutes plus overnight cure.
One shortcut that genuinely works: print the pieces nobody will inspect closely, like inner liners, mounting brackets and strap anchors, and skip finishing them entirely. Nobody photographs the inside of a bracer. Spend the hours you save on the helmet.
How We Print Cosplay Orders
Upload your files at /print. We print from the file you send — we do not sculpt or model armour to order, so bring a model you bought, downloaded or made, or generate one at /design. We accept STL, GLB, 3MF and sliced .gcode.3mf, with STL and GLB up to 100 MB and any 3MF up to 40 MB. We do not accept OBJ, which trips people up constantly because half the cosplay files on the internet ship as OBJ; export an STL or 3MF from Blender or your slicer first and it goes through fine.
Your quote comes from a real OrcaSlicer slice of your actual mesh wherever we can run one, not a bounding-box guess, so a hollowed helmet quotes as a hollowed helmet. If you send us a pre-sliced plate as a .gcode.3mf, its G-code passes an automated safety validation before it ever reaches a machine. The fleet is Bambu Lab H2S and P2S with 4-tray AMS units, so a two-tone helmet can come off the plate already in two colors instead of needing masked paint, at the two-colour PLA rate of $0.15 a gram rather than $0.12 — from a Bambu Studio or OrcaSlicer project with the two filaments assigned, or a plate you sliced for them, since a plain STL runs in the one color you picked. Live cameras cover the farm, and normal print ships in 4–5 business days, or 1–2 with Priority print ($5 at checkout), which matters when your con is on Friday: order early, or pay for Priority print and express postage.
FAQ
How much does a 3D printed cosplay helmet cost?
A hollow adult helmet slices to roughly 520 g of PLA, which is $62.40 at our $0.12 per gram all-in rate at standard 0.2 mm layers. Because that is over $49.50, US shipping is free. At premium 0.1 mm layers the same helmet is $109.20, which is rarely worth it on a piece you intend to prime and paint.
Can you 3D print cosplay armor in one piece?
No, and you would not want to. The build volume is 340 x 320 x 340 mm, so a chest plate alone needs two sections and a prop weapon needs three. Splitting is not a limitation to work around, it is how the piece gets strapped, transported, and repaired. A 13-part kit also packs into a suitcase.
What is the best material for cosplay armor?
PLA for nearly everything: cheapest at $0.12 per gram alongside PETG, prints large thin shells cleanly, and sands and primes better than the alternatives. Switch to PETG at the same $0.12 for buckles and strap anchors that take real load, TPU at $0.25 for flex joints and padding clips, and ASA at $0.14 for anything that will sit in a hot car or live outdoors.
How long does a cosplay kit take, start to finish?
Printing is the fast part. Normal print ships in 4–5 business days, or 1–2 with Priority print ($5 at checkout). Finishing is the schedule: figure roughly three evenings of glue, filler, sanding, primer and paint per large piece, so a six-piece kit is realistically two to three weeks of evenings. Start with the helmet, because it is the piece everyone photographs.
Ready to get started?
Upload a 3D model for instant pricing, or generate one with AI.