Add 3D Printing to Your App With One POST Request
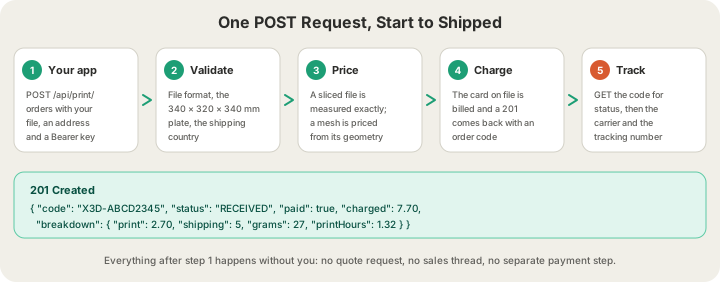
Adding 3D printing to your app takes one multipart POST to https://x3dstudios.com/api/print/orders carrying a model file, a shipping address and a Bearer key. The response comes back with an order code, the exact amount charged to your card on file, and a URL you can poll for status and tracking. There is no quote request, no sales thread and no separate payment step — the part is priced, paid for and queued at the farm in Austin inside that single round trip.
What One POST Request Actually Buys
Ordering a manufactured part normally means email. A print farm can skip that because nothing in the pipeline needs a human decision: price is a function of weight and material, scheduling is software packing jobs onto idle machines, and the file either passes validation or it does not. The wider argument for treating manufacturing as an HTTP call is in /blog/3d-printing-api-manufacturing-as-code. This post is the narrow version: the request, the fields, the response, and the errors worth handling.
Three Things Before the First Request
- An X3D account with a card on file. Key generation refuses without one, with a CARD_REQUIRED response — API orders bill automatically, so there is nowhere else for the money to come from.
- A key. Generate it on your profile page; the plaintext is shown exactly once and only a SHA-256 hash is stored. Keys look like x3d_live_… and are sent as Authorization: Bearer, or as x-api-key if your HTTP client makes that easier.
- A file in a format the farm accepts: STL, GLB, .gcode or a Bambu .gcode.3mf, up to 100 MB. OBJ is not accepted, so convert first if that is what your pipeline produces.
The Request
curl -X POST https://x3dstudios.com/api/print/orders \
  -H "Authorization: Bearer $X3D_API_KEY" \
  -F "[email protected]" \
  -F "material=pla" \
  -F "color=Matte Black" \
  -F "quality=standard" \
  -F "quantity=1" \
  -F "recipientName=Ada Lovelace" \
  -F "[email protected]" \
  -F "street1=1 Analytical Way" \
  -F "city=Austin" -F "state=TX" -F "zip=78750" -F "country=US" \
  -F "note=Ship flat, this is a jig"
That is the whole integration. It is multipart/form-data rather than JSON because a mesh has to travel with the order, and everything else rides along as form fields. Only the file and the address are genuinely required; the print configuration all has defaults that produce a sensible part.
The Fields That Matter
| Field | Required | What it does |
|---|---|---|
| file | Yes | STL, GLB, .gcode or .gcode.3mf, up to 100 MB |
| recipientName, street1, city, state, zip | Yes | Where the part ships. Add street2 for an apartment or suite |
| country | No | Defaults to US. Also CA, GB, AU, DE, FR, IN, NL, IE, NZ, SE, IT, ES, MX |
| No | Order updates. Defaults to the account email on the key | |
| material | No | pla (default), petg, abs, asa, tpu |
| quality | No | standard (0.2 mm, 1×) or premium (0.1 mm, 1.75× the rate) |
| quantity | No | 1–50. Bulk discounts apply from 5 units |
| infill | No | 10–100%, default 20. Meshes only — a sliced file keeps its own |
| nozzleDiameter, layerHeight | No | 0.4 mm and 0.20 mm by default. Meshes only |
| note | No | Up to 1,000 characters, and it travels with the job to the operator |
The mesh-only fields are worth flagging. If you send an already-sliced .gcode.3mf, the slicer has already fixed the infill, nozzle and layer height, so those fields are ignored rather than silently re-applied. Sending them anyway is harmless; expecting them to change a sliced file is not.
How the Price Is Decided Before Your Card Is Touched
Two different things happen depending on what you upload, and the difference is large enough to design around.
| You send | How weight is decided | How time is decided | Accuracy |
|---|---|---|---|
| A sliced .gcode / .gcode.3mf | The grams the slicer measured, purge included | The slicer's own estimate | Exact — it is the printer's own plan |
| An STL or GLB mesh | Mesh volume × infill × material density | Volume ÷ throughput for your nozzle and layer height | Close for solid parts, high for hollow ones |
So if your app already slices — or your users hand you a plate out of Bambu Studio — send the sliced file and you are billed the printer's own numbers, multi-colour purge and tool-change time included. /blog/how-to-export-sliced-file-bambu-studio covers producing one. If you only have a mesh, the estimate is deliberately built to sit slightly high rather than slightly low, because a quote that undershoots turns into a conversation nobody wanted.
The rate card itself is short. PLA is $0.12 per gram all-in, filament and normal machine time together, billable weight rounds up to the whole gram, and there is a $1.00 minimum per part. PETG and ABS are also $0.12, TPU $0.13 and ASA $0.14. Premium 0.1 mm layers bill at 1.75×. Shipping is $7 flat in the US and free over $50; international is $30 and free over $500. The full table lives on /pricing.
Here is one real bracket — 90 × 60 × 30 mm, 48 cm³ of solid volume — through four different requests. Everything except the changed field is identical:
| Request | Billable grams | Print hours | Per unit | Charged |
|---|---|---|---|---|
| material=pla, quality=standard | 27 g | 1.32 | $3.24 | $10.24 |
| material=petg | 27 g | 1.32 | $3.24 | $10.24 |
| quality=premium, layerHeight=0.10 | 27 g | 2.64 | $5.67 | $12.67 |
| quantity=10 | 27 g each | 1.32 each | $2.92 | $36.16 |
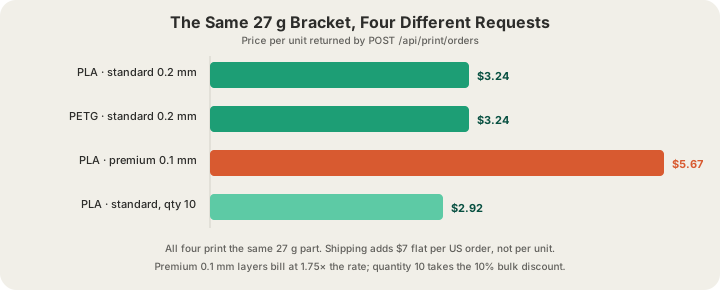
Two things fall out of that table. Switching material barely moves anything at this size — a bracket in PETG costs exactly the same as in PLA — so material should be chosen for the job rather than the invoice. Halving the layer height, on the other hand, nearly doubles the price and the machine hours together, which is why premium is worth spending on a visible surface and wasted on a jig.
curl -X POST https://x3dstudios.com/api/price \
  -H "Content-Type: application/json" \
  -d '{"bboxMm":{"x":90,"y":60,"z":30},"material":"pla","quality":"standard","quantity":1}'

# { "grams": 90, "printHours": 4.46, "materialCost": 10.8, "machineCost": 0,
#   "perUnit": 10.8, "subtotal": 10.8, "shipping": 7, "total": 17.8, "currency": "USD" }
What Comes Back, and What to Store
{
  "code": "X3D-ABCD2345",
  "status": "RECEIVED",
  "paid": true,
  "charged": 10.24,
  "currency": "USD",
  "breakdown": { "print": 3.24, "shipping": 7, "grams": 27, "printHours": 1.32 },
  "statusUrl": "https://x3dstudios.com/print/order/X3D-ABCD2345",
  "apiStatusUrl": "https://x3dstudios.com/api/print/orders/X3D-ABCD2345"
}
Store the code. It is the only handle you need afterwards, it is what your customer support will quote back at you, and statusUrl is a human-readable page you can hand to an end user without giving them an API key. The breakdown is worth persisting too: grams and printHours are the numbers that explain a price six weeks later when somebody asks why two similar orders cost different amounts.
Tracking It
Poll GET /api/print/orders/:code with the same key. It returns the current status, the estimated cost, and a tracking object with a number and carrier once the part is on its way. Statuses are a straight line and never go backwards:
| Status | What it means |
|---|---|
| PENDING_PAYMENT | Created but not paid — the card failed, use paymentUrl |
| RECEIVED | Paid, in the queue for review |
| ACCEPTED | Approved and queued to a printer |
| PRINTING | On a machine now |
| PRINTED | Off the plate and being packed |
| SHIPPED | Handed to the carrier, tracking available |
| DELIVERED | Carrier confirmed the drop |
Polling every few minutes is pointless. Most orders print, pack and ship inside 24 to 48 hours, so an hourly poll is plenty, and a daily one is fine if all you need is the tracking number. If you want to reason about the timing more carefully, /blog/how-much-does-custom-3d-printing-cost covers what drives both the price and the wait.
Errors Worth Handling
| Status | What it means | What to do |
|---|---|---|
| 401 | Invalid or missing API key | Check the Bearer header; the key may have been rotated |
| 400 | Missing required shipping fields | The response names them — validate before sending |
| 400 | Country not served | Fall back to the supported country list in your UI |
| 413 | File larger than 100 MB | Decimate the mesh or send a sliced file instead |
| 415 | Unsupported file | STL, GLB, .gcode or .gcode.3mf only — OBJ is rejected here |
| 422 | Could not analyse the file | The mesh is unreadable or has no volume; repair and retry |
| 402 | CARD_REQUIRED on key generation | Add a card on file, then generate the key |
The 415 and 422 cases are the ones a real integration hits, because they come from user-supplied files rather than from your code. Both are worth surfacing verbatim to whoever uploaded the model — the messages name the actual problem, and a user who sent an OBJ can fix it in thirty seconds if you tell them what to export instead.
Skip the Upload Entirely
If the model came out of our own generator, you do not need to download and re-upload several megabytes to order it. POST /api/generate returns a modelUrl for the finished model along with a print-readiness verdict, and the order endpoint accepts that modelUrl in place of a file. Ownership is re-checked server-side rather than taken on trust, so the model has to belong to the account holding the key. The full endpoint reference, including the generation options, is on /api-docs.
That closes a loop that used to need a person in it: your app describes a part, gets a validated mesh back, orders it, and receives a tracking number — all inside one process, with the only physical step happening on a Bambu Lab H2S or P2S in Austin.
FAQ
Do I need a webhook, or is polling fine?
Polling is fine. The status endpoint is cheap, the timeline is measured in hours rather than seconds, and an hourly check catches every transition that matters. The one event worth watching for is SHIPPED, because that is when a tracking number appears.
How small an order can I place?
One part. Billable weight rounds up to the whole gram and there is a $1.00 minimum per part, so a 3 g keyring is $1.00 plus $7 flat US shipping. There is no setup fee, no per-order minimum beyond that, and no discount cliff you have to reach before the API is worth using.
Can I send an OBJ file?
No — the endpoint returns 415 for it. Send an STL or GLB mesh, or an already-sliced .gcode or .gcode.3mf plate. Any modelling tool exports STL in seconds; if you want colour, scale and the printer's own measured weight to survive the trip, slice it in Bambu Studio and send the .gcode.3mf instead.
What happens if the part is too big?
The fleet plate is 340 × 320 × 340 mm, measured in the part's best orientation rather than axis by axis, so a long thin model that fits rotated is not rejected on one dimension. Anything genuinely larger has to be split into pieces and ordered as a multi-part job.
Ready to get started?
Upload a 3D model for instant pricing, or generate one with AI.