Building a Custom Merch Store With a 3D Printing API
A custom merch store built on a 3D printing API is an online shop where nothing exists until somebody buys it: your storefront takes the order, calls a print farm for the price and the job, and the farm manufactures that single unit and ships it. There is no minimum run, no inventory sitting in a closet, and no screen-printing setup fee — on our farm in Austin every part is $0.12 per gram of PLA all-in with a $1.00 minimum, plus $7 flat US shipping that goes free over $50. This guide covers the four calls a merch store actually needs, what a real catalog costs per unit, and the file rules that decide whether the farm accepts your products at all.
Why Merch Is the Easiest Thing to Put Behind a Print API
Merch is unusually well suited to on-demand manufacturing because the hard parts of merch are not manufacturing. A t-shirt company's real problems are size curves, dead stock in XXL, and a minimum order of 144 units before the printer will talk to you. A 3D-printed catalog has none of those. There is one SKU per design, one file per SKU, and the quantity you commit to is the quantity somebody has already paid for.
It is also the category where the pricing model is easiest to reason about. Print farm pricing is a pure function of weight and material, not a negotiated quote, which means your margin on every item is a number you can compute at design time and hard-code into the catalog. That is the same property that makes a print farm API viable in the first place, and we wrote about the broader idea in /blog/3d-printing-api-manufacturing-as-code. Merch is just the version of it that pays for itself first.
The catch is that plastic merch is a different product category from apparel, not a cheaper version of it. Nobody wants a printed t-shirt substitute. They want the desk objects — cable clips, nameplates, phone stands, bottle openers, award trophies, planters — the things that sit in eyeline all day. Get the catalog right and the API part is easy.
The Four Calls a Merch Store Needs
1. Price the catalog once, not on every page load
Our /api/price endpoint quotes a part from a bounding box, material, quality and quantity, and returns the grams, the print hours and the full breakdown. It is fast and it is fine for a configurator where a shopper is scaling something up and down live. But a bounding box is an approximation: a hollow planter and a solid paperweight with the same footprint quote the same way and print very differently.
curl -X POST https://x3dstudios.com/api/price \
  -H "Content-Type: application/json" \
  -d '{
    "bboxMm": { "x": 95, "y": 60, "z": 18 },
    "material": "pla",
    "quality": "standard",
    "quantity": 1
  }'

# Response
{
  "grams": 57,
  "printHours": 2.82,
  "materialCost": 6.84,
  "machineCost": 0,
  "perUnit": 6.84,
  "subtotal": 6.84,
  "shipping": 7,
  "total": 13.84,
  "currency": "USD"
}
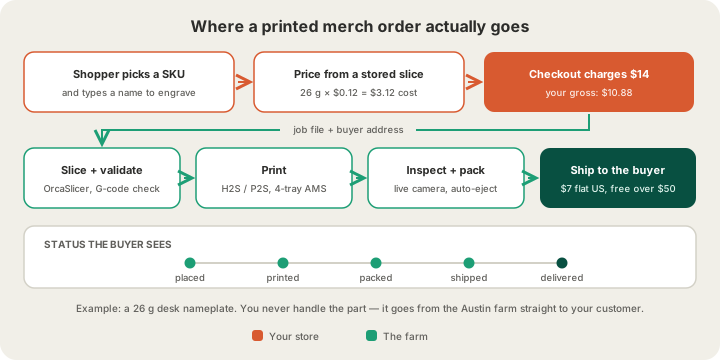
For a fixed catalog, do it the accurate way instead: upload each product file once at /print, let the farm run a real OrcaSlicer slice of the actual geometry, and store that gram count against the SKU in your own database. Your storefront then does zero pricing work at runtime — it looks up a number you already trust. Re-slice only when you change the model.
2. Take the money on your side
The farm is a manufacturer, not your payment processor. Your storefront charges the customer with whatever you already use, holds the order, and only then submits the job. Keep the two ledgers separate: your customer paid $19 for a phone stand, and you paid the farm $5.76 to make it. Blending those into one number is how print-on-demand businesses discover in month four that shipping ate the margin.
3. Submit the job with the buyer's address
This is the drop-ship step. You send the stored model file, the material and colour, the quantity, and the shipping address the customer entered, and the farm prints it and ships it to them directly. Nothing routes through you, which is the entire point — a merch store with a warehouse is not a merch store, it is a warehouse with a website.
4. Report the five stages back to the buyer
Orders move through five states a customer can see: placed, printed, packed, shipped, delivered. Mirror those into your own order page verbatim rather than inventing your own vocabulary. "Printed" is a genuinely reassuring status update in a way that "processing" never is, because it tells someone their specific object physically exists now. Most orders print in 24 to 48 hours and ship straight after.
What Your Catalog Actually Costs
Here is a five-SKU starter catalog with real weights, priced at the PLA rate of $0.12 per gram all-in. "All-in" means filament and normal machine time together — there is no separate machine-hour line to forecast, which is what makes a printed catalog easy to price.
| Product | PLA weight | Farm cost | Store price | Gross per unit |
|---|---|---|---|---|
| Logo cable clip | 9 g | $1.08 | $7 | $5.92 |
| Desk nameplate | 26 g | $3.12 | $14 | $10.88 |
| Phone stand | 48 g | $5.76 | $19 | $13.24 |
| Award trophy | 115 g | $13.80 | $39 | $25.20 |
| Faceted planter | 165 g | $19.80 | $42 | $22.20 |
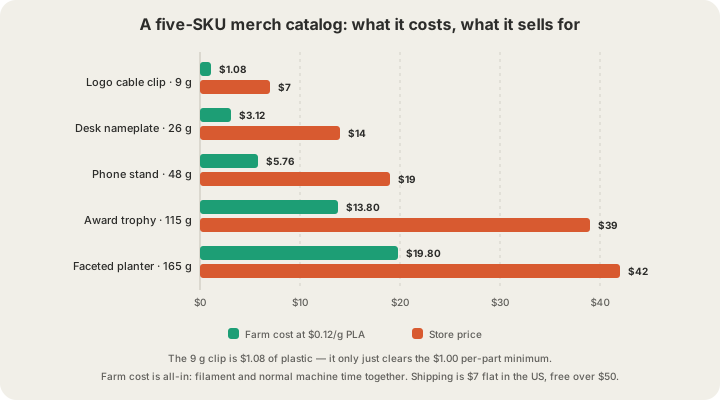
Two details in that table are worth staring at. The cable clip weighs 9 g, so at $1.08 it only just clears the $1.00 per-part minimum — small items are the one place where weight-based pricing stops being linear, and it is why a catalog of nothing but tiny trinkets has worse unit economics than you would expect. And the planter is the most expensive item to make but not the best margin, because heavy objects scale their cost with size while their perceived value does not.
Shipping is $7 flat anywhere in the US and free over $50, which is a design constraint disguised as a shipping policy. A bundle priced at $52 ships free and reads as a better deal than a $42 planter plus $7. Local buyers can collect in Austin for nothing at all. If you want the full breakdown of how per-gram pricing behaves across materials, /blog/how-much-does-custom-3d-printing-cost walks through it, material by material.
Bulk discounts apply per order, not per month: 5 or more units takes 5% off and 10 or more takes 10%. That matters most for the corporate side of a merch store — the customer ordering 40 onboarding kits at once is the one who actually moves your revenue, and they get the discount automatically.
File Rules the Farm Enforces
A merch store lives or dies on whether its product files are acceptable to the machine. Ours takes four formats, and the list has one omission that catches people out constantly.
| Format | Accepted | Size limit | Use it for |
|---|---|---|---|
| STL | Yes | 100 MB | The default for a fixed catalog |
| 3MF | Yes | 100 MB | Multi-part or multi-colour products |
| GLB | Yes | 100 MB | Files coming straight out of a 3D generator |
| G-code / .gcode.3mf | Yes | 40 MB | You sliced it yourself and want exact control |
| OBJ | No | — | Convert to STL or 3MF before it reaches the catalog |
The other hard limit is size: the build volume on our Bambu Lab H2S machines is 340 × 320 × 340 mm, and the fleet is H2S and P2S printers. Anything larger has to be designed as an assembly. That is rarely a problem for merch, where the useful size range is roughly a keychain to a desk lamp, but it does rule out the one oversized hero product somebody will inevitably suggest. If you are unsure which format your source files should be in, /blog/what-file-do-i-need-to-3d-print covers the tradeoffs in detail.
Personalization: The Thing Screen Printing Cannot Do
Here is where a printed merch store stops competing with apparel on price and starts competing on something apparel cannot offer. Because every unit is manufactured individually, a unit with a customer's name embossed on it costs exactly the same as a blank one. There is no setup, no plate, no per-variant minimum. The marginal cost of "personalized" is zero.
Mechanically this means your store generates the model rather than storing it: take a base model with a text feature, substitute the buyer's string, export STL or 3MF, submit that as the job. Keep the raised text at least 1 mm proud of the surface and use a font without hairline strokes — sub-millimetre serifs disappear at 0.2 mm layers. Everything else is a string substitution.
- Nameplates and door signs with the buyer's name, generated at checkout from a text field.
- Award trophies with a date and a milestone number, which is a corporate order every single quarter.
- Keychains carrying a coordinate, an initial, or a serial number from your own product.
- Onboarding kits where each new hire's object is different and nobody had to think about it.
Multi-Colour Branding and What It Adds
Brand colours usually mean a second material, and our printers handle that with a 4-tray AMS: up to four filaments loaded at once, swapped mid-print. The swaps have to be in the file: submit a plate you painted and sliced yourself as a .gcode.3mf, because a mesh the API hands us to slice comes back in the single filament the order named. A two-tone logo plate or a coloured inlay in a nameplate is well within reach, and /blog/two-color-logos-and-signs covers how to build the geometry for it.
It is not free, though, and the cost is honest rather than hidden. Each filament change stalls the machine about 1.3 minutes and purges 84 mm³ of plastic to flush the old colour out of the hotend, and both land inside the grams and hours your sliced file reports — which is what we bill from, with nothing added on top. On a part with a handful of changes that is pennies. On a part where the two colours alternate on every layer for the full height, the purge can outweigh the part. The practical rule for merch: keep colour changes to distinct zones — a logo inset, a coloured base, a banded top — rather than interleaved detail.
Who Does What
| Job | Your store | The farm |
|---|---|---|
| Catalog, photos, copy | Yours | — |
| Payment and refunds | Yours | — |
| Per-unit price | Cached from a real slice | Computes it from grams |
| Personalization geometry | Generated at checkout | Prints what arrives |
| Slicing and machine choice | — | OrcaSlicer, H2S / P2S fleet |
| Quality check | — | Live cameras, G-code validation, auto-eject |
| Packing and shipping | — | $7 flat US, free over $50 |
| Customer support | Yours | — |
That division is the whole appeal. You are running a design and marketing business with a manufacturing dependency that behaves like an API call, which is a very different company from one that owns printers. Nobody on your side ever has to know that G-code is safety-validated before it reaches a hotend, or that a failed plate re-queues itself. Those stay the farm's problems as your volume grows.
FAQ
How much does it cost to start a 3D printed merch store?
Close to nothing in manufacturing terms, because you never buy inventory. Your real costs are the storefront and the design time. Proving the catalog physically costs one sample of each SKU: the five products above come to $43.56 of parts plus $7 flat shipping, so you can hold your entire launch catalog for about $51.
Do I need API access to run a print-on-demand store?
Not to start. The developer API is in private beta, but the ordering flow at /print takes the same files, prices from the same real slice, and runs on the same machines. Plenty of stores run manual submission until the volume justifies automating it — and at that point you already know your exact gram counts.
What margin should I expect on 3D printed merch?
Work backwards from grams rather than picking a multiplier. Farm cost is weight × the material rate, PLA at $0.12 per gram all-in with a $1.00 floor, so a 48 g phone stand costs $5.76 to make. What you charge is a branding decision; what it costs is arithmetic you can do before you model anything.
Can customers personalize each item themselves?
Yes, and it is the strongest reason to choose printed merch over printed cotton. Because units are made one at a time, a custom name or date adds no cost. Your store substitutes the text into the base model, exports STL or 3MF — not OBJ, which we do not accept — and submits that file as the job.
How fast do orders reach the customer?
Most orders print in 24 to 48 hours in Austin and then ship, with the buyer watching placed, printed, packed, shipped and delivered along the way. Local customers can pick up for free, which is a genuinely nice option to offer if your audience is regional.
Ready to get started?
Upload a 3D model for instant pricing, or generate one with AI.