From Figma to Physical: 2D Designs Into Printed Objects
You cannot print a Figma file directly, but you can get from one to a physical object in three steps: flatten the artwork into closed vector shapes, export it as SVG, and extrude that SVG to a real thickness in a 3D tool before saving it as STL, GLB or 3MF. The only genuinely new idea is depth. Everything else is housekeeping you already know how to do in Figma, and once the mesh exists our farm quotes it by weight at $0.12 per gram of PLA, all-in.
Why a Figma File Cannot Go Straight to a Printer
Figma describes a picture. A 3D printer needs a solid: a closed surface with an inside and an outside, measured in millimetres, that a slicer can fill with plastic. Those are different kinds of information, and three things are missing from every Figma frame. There is no Z axis, so nothing has thickness. There is no physical unit, because a 400 px wide frame could be a keychain or a doorplate. And there is no guarantee the shapes are closed, since Figma is perfectly happy with a stroke that has no fill, a text layer that is still editable text, and two rectangles that overlap without either one knowing.
So the job is to answer those three questions before you ever open a 3D tool. Most of the failed prints we see from design files fail for one of them, not for anything exotic.
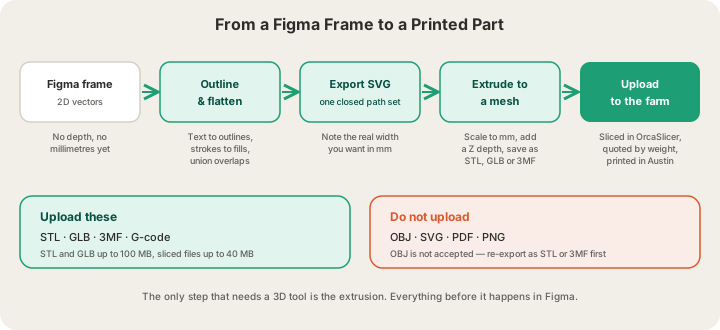
Step One: Prepare the Artwork in Figma
Duplicate your frame first and work on the copy — everything below is destructive, and you will want the editable original back when the client changes the logo. Then, in this order:
- Convert every text layer to outlines. Text that stays as text either exports as a font reference the extruder cannot read, or silently substitutes a different typeface.
- Outline all strokes. A 2 px stroke is a line with no area; outlined, it becomes a filled shape with a real width you can measure.
- Union overlapping shapes into one path. Two overlapping circles that stay separate become two intersecting walls in the mesh, and slicers resolve that ambiguity differently than you expect.
- Delete anything that only exists as a rendering effect: drop shadows, blurs, inner shadows, gradients, and any layer below 100% opacity. Plastic is opaque and has no blur radius.
- Flatten the result. You want one path, or a small set of paths, each of which is a closed loop.
- Decide the real width of the finished object in millimetres and write it down. You will need it in the next tool.
Here is what happens to each kind of Figma property once it leaves the vector world:
| In Figma | What it becomes in a printed part |
|---|---|
| Fill colour | Nothing geometric — it becomes a filament choice at checkout |
| Stroke | Ignored, unless you outline it into a filled shape first |
| Live text layer | Unreliable. Outline it before exporting |
| Drop shadow, blur, gradient | Dropped entirely |
| Opacity below 100% | Dropped — printed plastic is opaque |
| Overlapping shapes | Intersecting walls, unless unioned |
| Frame width in px | Meaningless until you scale it to millimetres |
Step Two: Export the SVG
Select the flattened frame and export as SVG. Turn off "include id attribute" and any option that adds CSS classes if your exporter offers them; extrusion tools read the path data and ignore the rest, but a smaller file is easier to inspect. Open the result in a text editor once. You are looking for a handful of path elements with a d attribute, and no image, text or filter tags. If you see an image tag, part of your design was a bitmap and needs to be redrawn as vectors.
Step Three: Extrude the SVG Into a Mesh
Extruding means sweeping the 2D outline along the Z axis to give it depth. Every tool below does it; they differ in how much control you get and how steep the learning curve is.
| Tool | Cost | How the extrusion works | Best when |
|---|---|---|---|
| Tinkercad | Free, browser | Import SVG, set height in mm, drag to size | One flat shape, first time doing this |
| Blender | Free | Import SVG as curve, set extrude depth, convert to mesh | Multiple layers, bevels, exporting GLB |
| Fusion 360 | Free for hobby | Insert SVG on a sketch plane, extrude, keep it parametric | The depth will change and you want to re-drive it |
| Bambu Studio / OrcaSlicer | Free | Import an SVG straight onto the plate with a set thickness | A quick sign you plan to slice yourself |
| X3D AI generator | Credits | Describe the object in words at /design and get a mesh back | You want a shaped object, not a flat extrusion |
Whatever you use, do two things before exporting. Set the overall width to the millimetre figure you wrote down in step one — most SVG importers treat one user unit as one millimetre, which makes a 400 px logo come in at 400 mm and blow past the plate. Then check that the model is a closed solid rather than a surface; Blender in particular will happily give you a zero-thickness plane if the extrude depth is still zero. Our /blog/why-print-ready-matters-mesh-validation post covers what "closed" actually means and how to test for it.
Export as STL if the part is one colour, or 3MF if you want to keep separate bodies for a multi-colour job. Do not export OBJ — we do not accept it, and re-exporting later is a needless round trip. If you are unsure which format your tool should be writing, /blog/what-file-do-i-need-to-3d-print is the short version.
How Thick Should It Be?
Depth is the single dial that moves the price, because we charge by weight. Below is what a plain 90 mm round badge costs in PLA at each common thickness, at our standard 0.2 mm layer height. Billable weight rounds up to the whole gram and there is a $1.00 minimum per part.
| Depth | Feels like | Billable weight | PLA price |
|---|---|---|---|
| 2 mm | A flexible token or tag — will bow if it is wide | 8 g | $1.00 (minimum applies) |
| 3 mm | A rigid coaster or keychain fob | 11 g | $1.32 |
| 4 mm | A solid badge, the safe default | 15 g | $1.80 |
| 6 mm | A desk sign that stands on its own edge | 22 g | $2.64 |
| 10 mm | A paperweight with real heft | 36 g | $4.32 |
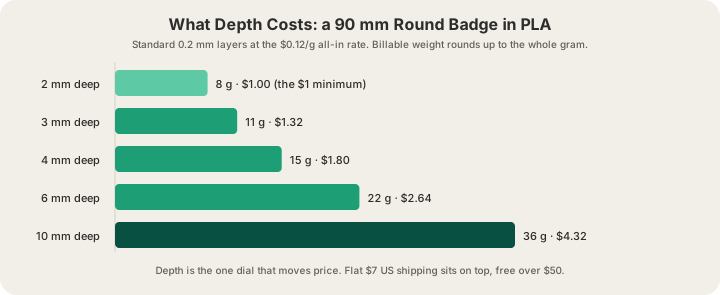
Those figures come from our quote model before the slicer refines them. When you upload, we slice the actual mesh in OrcaSlicer where we can, so the number you pay is measured rather than estimated — a thin part with lots of wall relative to its volume can weigh noticeably more than a volume estimate suggests.
Detail That Survives a 0.4 mm Nozzle
A design that reads beautifully at 100% zoom in Figma can lose half its features in plastic. The practical floor is roughly two extrusion widths, about 0.8 mm, for any raised or recessed feature you want to actually see and feel. A hairline rule, a 1 px keyline, or the counters inside a 6 pt typeface all fall well under that once scaled to a 90 mm badge.
- Keep raised strokes at 1 mm wide or more, and recessed grooves at 0.8 mm or more.
- Give engraved text at least 1.5 mm of stroke width; below that, letters merge into a smudge.
- Round sharp interior corners slightly — a 0.4 mm nozzle cannot draw a perfect inside corner anyway.
- Check the smallest feature at the final size, not at the design size. Scaling a 200 mm concept down to 40 mm shrinks every detail by five.
If your design has parts that need to fit together — a badge that clips into a base, a logo inlaid into a plate — read /blog/3d-printing-tolerances-guide before you commit to dimensions. Clearance is the difference between a satisfying snap and a part you sand for twenty minutes.
Two Colours, Because Logos Usually Have Two
Most brand marks are not one colour, and a flat extrusion in one filament loses the whole point. The standard trick is a two-body model: a base plate at, say, 3 mm, and the mark itself raised 0.6 to 1 mm on top of it as a separate body. Export that as 3MF so the bodies stay distinct, and each one can be assigned a filament from the AMS, which holds four spools per machine. Do the assigning and the slicing in Bambu Studio or OrcaSlicer: a mesh we slice for you prints in the single filament you chose, so the sliced .gcode.3mf is what carries the split through to the printer.
Colour changes are not free: every swap purges 84 mm³ of filament out of the hotend and stalls the print about 1.3 minutes. On the sliced plate you upload, both are already inside the grams and hours we bill from rather than a surcharge on top. A two-colour badge is a rounding error; a four-colour plate with a change on every layer is not. /blog/two-color-logos-and-signs walks through designing a mark for exactly this treatment, including which half of the artwork should be the raised one.
Sizing to the Plate, Then Ordering
Our fleet is Bambu Lab H2S and P2S machines, and the usable build volume is 340 × 320 × 340 mm. That is a generous door sign but not a full storefront panel, so a large piece either gets scaled down or split into tiles that key together along a hidden seam.
When the mesh is ready, upload it at /print. You get a weight-based quote from a real slice, pick a material and colour, and the part goes into the queue in Austin. Most orders print in 24 to 48 hours, US shipping is a flat $7 and free over $50, and local pickup in Austin is an option if you would rather see the first sample the same week you designed it.
FAQ
Can you 3D print directly from Figma?
No. Figma has no Z axis, no millimetre units and no concept of a closed solid, so there is nothing for a slicer to fill. You export SVG from Figma and extrude it to a thickness in a 3D tool — Tinkercad, Blender or Fusion 360 all do this in a few minutes — then upload the resulting STL, GLB or 3MF.
What file should I export from Figma for 3D printing?
SVG, as an intermediate. It preserves the vector paths that an extrusion tool needs. PNG and PDF exports do not survive the trip: a PNG is pixels, and a PDF carries print metadata nobody in the 3D chain reads. The file you eventually upload to us is STL, GLB, 3MF or G-code — OBJ is not accepted.
How thick should a 3D printed logo be?
For a badge or coaster up to about 100 mm across, 3 to 4 mm is the sweet spot: rigid enough not to bow, cheap enough to reprint. Go to 6 mm or more if the piece has to stand on its own edge, and keep any raised detail on top at 0.6 to 1 mm so it reads without adding much weight.
Can a Figma design be printed in more than one colour?
Yes, if you slice it yourself. Split the artwork into separate bodies in your 3D tool — usually a base plate plus a raised mark — assign each body a filament in Bambu Studio or OrcaSlicer, slice, and upload the .gcode.3mf. Each body then runs from its own tray in the four-tray AMS; a mesh we slice for you prints in one filament instead. The changes cost 84 mm³ of purge and about 1.3 minutes each, which is negligible for two colours on a small part.
Ready to get started?
Upload a 3D model for instant pricing, or generate one with AI.