Image to 3D Model: Turn Any Photo into a Real 3D Print
An image to 3D model tool turns a single photo into a printable 3D mesh using AI. You upload one picture of an object, the model infers the geometry the camera never saw, and about 45 to 90 seconds later you have a full 3D model. On our platform that model is also validated for printing, so the same photo can become a physical part at your door, at the print speed and shipping you choose at checkout. /photo-to-3d-print sets out the cost, the sizes and what to expect. The catch: output quality tracks photo quality almost one to one. Here is what works, what fails, and the exact steps.
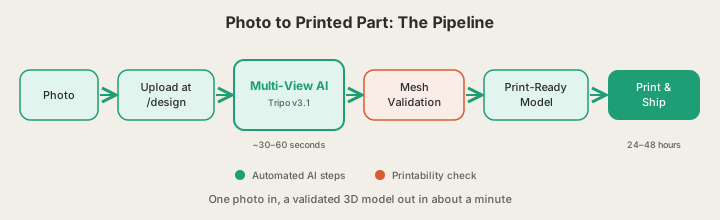
How Image-to-3D Model AI Works
A photo is one viewpoint. To build a 3D model, the AI has to answer a question the image never does: what does the back look like? Modern image-to-3D systems solve this with multi-view inference. A model trained on millions of 3D objects predicts what your object would look like from other angles, then fuses those predicted views into a single coherent mesh with geometry and texture. We run Tripo v3.1 for this step, and a typical photo generation takes about 45 to 90 seconds. /docs/studio/image-to-3d explains which photos turn into good models.
Raw AI meshes are not automatically printable. They can contain holes, non-manifold edges, or walls thinner than a nozzle can extrude. That is why every model generated on x3dstudios.com passes through built-in mesh validation: the mesh is checked and repaired to be watertight and structurally printable before you ever see the order button. A model that fails the check cannot be ordered until it is fixed, so a mesh that only looks good on screen is caught before it reaches a printer.
This is a different approach from photogrammetry, the older photo-to-3D technique that stitches 50 to 200 overlapping photos into a scan. Photogrammetry captures true geometry but demands a careful capture session and hours of processing. Single-image AI, which turns one 2D image into a 3D model, trades a little fidelity on hidden surfaces for a workflow that takes one phone photo and one minute, which is the right trade for figurines, product mockups, replacement-part starting points, and gifts.
What Photos Work Best
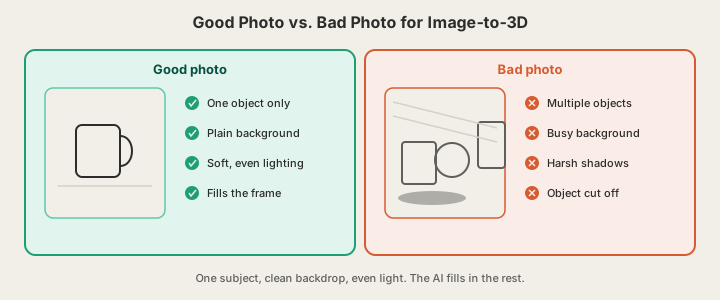
One object, front and center
The AI reconstructs one subject. If your photo has three objects, a hand holding the item, or a busy tabletop, the model has to guess where your object ends and the scene begins, and it guesses wrong more often. Shoot the object alone, roughly centered, filling most of the frame.
Clean, contrasting background
A plain wall, a sheet of paper, or a solid-color surface makes segmentation trivial. Patterned backgrounds bleed into the reconstruction as phantom geometry or texture noise. If the object is dark, use a light background, and vice versa.
Soft, even lighting
The AI reads shading as shape. Harsh side light and hard shadows get baked into the model as dents and dark patches; direct flash flattens depth cues. Indirect daylight near a window is the easiest reliable setup, and it costs nothing.
| Photo factor | Works well | Causes problems |
|---|---|---|
| Subject | One object, isolated | Multiple or overlapping objects |
| Background | Plain wall, solid color | Clutter, patterns, other items |
| Lighting | Diffuse daylight | Hard shadows, direct flash |
| Surface | Matte or lightly textured | Mirror, glass, polished chrome |
| Framing | Object fills 70%+ of frame | Cropped edges, subject far away |
| Angle | 3/4 view showing two sides | Extreme top-down or straight-on |
Photo to Printed Part in Four Steps
- Open the AI generator at x3dstudios.com/design and switch to image input.
- Upload your photo (JPG or PNG). A quick crop to remove dead space helps.
- Wait about 45 to 90 seconds. Tripo v3.1 generates the mesh and validation confirms it is watertight and printable. Inspect it in the 3D viewer from every angle.
- Pick a size and material (PLA, PETG, ABS, ASA, or TPU) and order. Our farm in Austin prints it on Bambu Lab CoreXY machines; normal print ships in 4–5 business days, or 1–2 with Priority print (10% of the items, at least $10).
Printing is priced by weight at $0.12 per gram of PLA all-in, with a $1 minimum order. A palm-sized figurine generated from a photo typically lands between $9 and $13 printed and shipped, which is less than most sites charge for the model file alone.
Where Image-to-3D Still Struggles
Occluded geometry
The AI never saw the back of your object, so it predicts it. For symmetric things like mugs, bottles, figures, and toys, the prediction is usually excellent. For objects with important asymmetric detail on the hidden side, expect the AI's plausible guess rather than the truth. Photograph the side that matters, or shoot a 3/4 angle that reveals two faces at once.
Reflective and transparent surfaces
Glass, mirrors, and polished chrome break the depth cues the model relies on: reflections read as geometry that is not there, and transparency reads as nothing at all. A light dusting of the scene with a matte object, or simply choosing a matte version of the subject, produces dramatically better meshes.
Very thin or wiry features
Eyeglass frames, wire baskets, and thin stems sit at the edge of both AI reconstruction and FDM printing. Our validation step thickens or flags fragile geometry, but chunky subjects will always convert more faithfully than wiry ones.
None of these limits are dealbreakers; they just set expectations. A well-shot photo of a matte, single object converts cleanly on the first try in our experience, and the 3D viewer lets you verify every angle before any money is spent on printing.
The 10-Second Photo Checklist
- One object only, nothing held in a hand
- Plain, contrasting background
- Indirect, even light with no hard shadows
- Object fills at least 70% of the frame
- 3/4 angle showing front and one side
- Matte surface if you have the choice
FAQ
Can I convert an image to a 3D model for free?
Yes. Signing up on x3dstudios.com gives you 5 free credits, enough to convert several photos into validated 3D models. You only pay if you decide to have one printed, starting at the $1 minimum order.
How long does it take to convert an image to a 3D model?
Generation from a photo plus mesh validation takes about 45 to 90 seconds. If you order a print, normal print ships in 4–5 business days, or 1–2 with Priority print (10% of the items, at least $10), so photo to physical object is typically about two weeks including standard transit, or 3–5 business days with Priority print and express postage.
What image formats and resolution do I need?
Standard JPG or PNG works. Aim for at least 1024 pixels on the short side; any modern phone camera clears that easily. Sharpness and lighting matter far more than megapixels.
Is one photo really enough?
For most everyday objects, yes: multi-view inference fills in hidden surfaces convincingly. One photo will not capture unique detail on the hidden side, so shoot the most informative angle. If no photo exists at all, describe the object in text at the same generator and skip the camera entirely.
Price it now
What would yours cost?
A real example, priced from our India rates: a 50 g PLA part comes to ₹400 printed, plus ₹79 delivery in India. Change the weight, material or quantity below and the price follows.
- 50 g × ₹8/g, per part
- ₹400
- Delivery
- ₹79
An estimate from the weight you entered. The real quote weighs your file.
Two ways to your real price
Have a file?
Upload it. See the exact price.
Drop in your STL or 3MF. We slice it and price the grams it really uses, in rupees. No account needed to see it.
Only an idea?
Describe it. We’ll email you a price.
No file, no problem. A few words on what it is and how big is plenty to start.
Or write to contact@x3dstudios.com